微信公众号开发 Java 版
源码地址:
一.申请微信开发者账号
- 注册账号
- 申请测试号
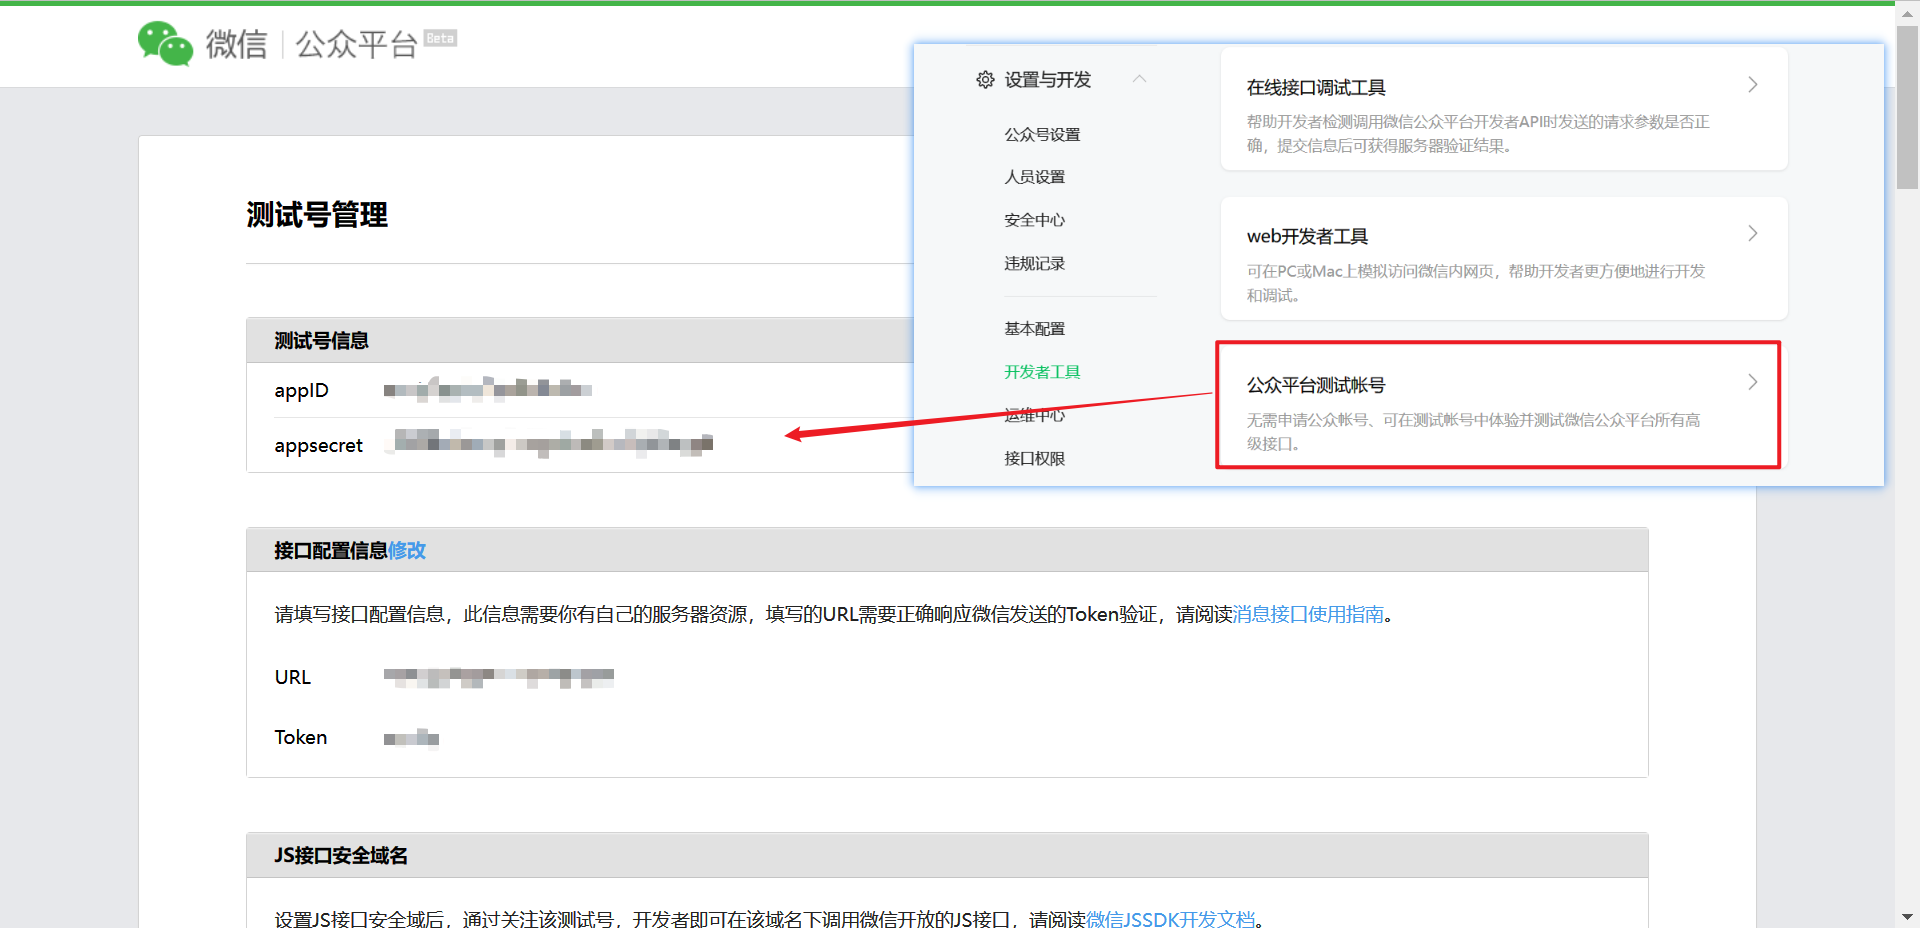
二.开发平台与 Java 端绑定
- 基本开发环境
- springboot 2.7.2
- mysql 8.0
1
2
3
4
5
6
7
8
9
10
11
12
13
14
15
16
17
18
19
20
21
22
23
24
25
26
27
28
29
30
31
32
33
34
35
36
37
| <dependencies>
<dependency>
<groupId>org.springframework.boot</groupId>
<artifactId>spring-boot-starter-web</artifactId>
</dependency>
<dependency>
<groupId>org.mybatis.spring.boot</groupId>
<artifactId>mybatis-spring-boot-starter</artifactId>
<version>2.3.0</version>
</dependency>
<dependency>
<groupId>cn.hutool</groupId>
<artifactId>hutool-all</artifactId>
<version>5.8.8</version>
</dependency>
<dependency>
<groupId>com.baomidou</groupId>
<artifactId>mybatis-plus-boot-starter</artifactId>
<version>3.5.2</version>
</dependency>
<dependency>
<groupId>mysql</groupId>
<artifactId>mysql-connector-java</artifactId>
<scope>runtime</scope>
</dependency>
<dependency>
<groupId>org.projectlombok</groupId>
<artifactId>lombok</artifactId>
<optional>true</optional>
</dependency>
<dependency>
<groupId>org.springframework.boot</groupId>
<artifactId>spring-boot-starter-test</artifactId>
<scope>test</scope>
</dependency>
</dependencies>
|
- 引入微信公众号开发依赖
1
2
3
4
5
| <dependency>
<groupId>com.github.binarywang</groupId>
<artifactId>wx-java-mp-spring-boot-starter</artifactId>
<version>4.4.0</version>
</dependency>
|
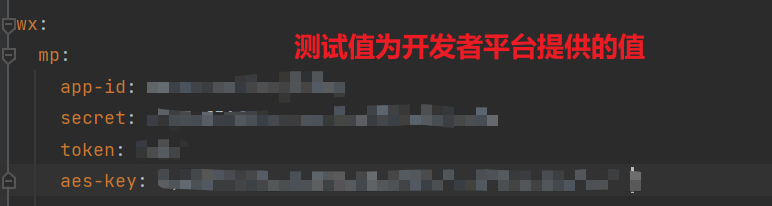
- 配置微信公众号测试号相关参数
- app-id 和 secret 为第一步中测试号提供的 appid 和 appsecret
- token 为接口配置信息中的 Token,自定义就好
1
2
3
4
5
6
| wx:
mp:
app-id: your-app-id
secret: your-appsecret
token: your-token
aes-key:
|
- 配置类,配置 WxMpService
1
2
3
4
5
6
7
8
9
10
11
12
13
14
15
16
17
18
19
20
21
22
23
24
25
26
27
28
29
30
31
32
|
@Component
public class ConstantPropertiesUtil implements InitializingBean {
@Value("${wx.mp.app-id}")
private String appid;
@Value("${wx.mp.secret}")
private String appsecret;
@Value("${wx.mp.token}")
private String token;
@Value("${wx.mp.aes-key}")
private String aes_key;
public static String ACCESS_KEY_ID;
public static String ACCESS_KEY_SECRET;
public static String TOKEN;
public static String AES_KEY;
@Override
public void afterPropertiesSet() throws Exception {
ACCESS_KEY_ID = appid;
ACCESS_KEY_SECRET = appsecret;
TOKEN = token;
AES_KEY = aes_key;
}
}
|
1
2
3
4
5
6
7
8
9
10
11
12
13
14
15
16
17
18
19
20
21
22
23
24
25
26
27
|
@Configuration
@Data
public class WeChatMpConfig {
@Autowired
private ConstantPropertiesUtil constantPropertiesUtil;
@Bean
public WxMpService wxMpService(){
WxMpService wxMpService = new WxMpServiceImpl();
wxMpService.setWxMpConfigStorage(wxMpConfigStorage());
return wxMpService;
}
@Bean
public WxMpConfigStorage wxMpConfigStorage(){
WxMpDefaultConfigImpl wxMpConfigStorage = new WxMpDefaultConfigImpl();
wxMpConfigStorage.setAppId(ConstantPropertiesUtil.ACCESS_KEY_ID);
wxMpConfigStorage.setSecret(ConstantPropertiesUtil.ACCESS_KEY_SECRET);
wxMpConfigStorage.setToken(ConstantPropertiesUtil.TOKEN);
wxMpConfigStorage.setAesKey(ConstantPropertiesUtil.AES_KEY);
return wxMpConfigStorage;
}
}
|
搭建微信公众号服务
1
2
3
4
5
6
7
8
9
10
11
12
13
14
15
16
17
18
19
20
21
22
23
24
|
@RestController
@RequestMapping("/")
@Slf4j
@CrossOrigin
public class WxMpController {
@Resource
private WxMpService wxMpService;
@GetMapping
public String check(String timestamp, String nonce, String signature, String echostr) {
log.info("check,timestamp:{},nonce:{},signature:{},echostr:{}", timestamp, nonce, signature, echostr);
if (wxMpService.checkSignature(timestamp, nonce, signature)) {
log.info("check success,echostr:{}", echostr);
return echostr;
} else {
return "";
}
}
}
|
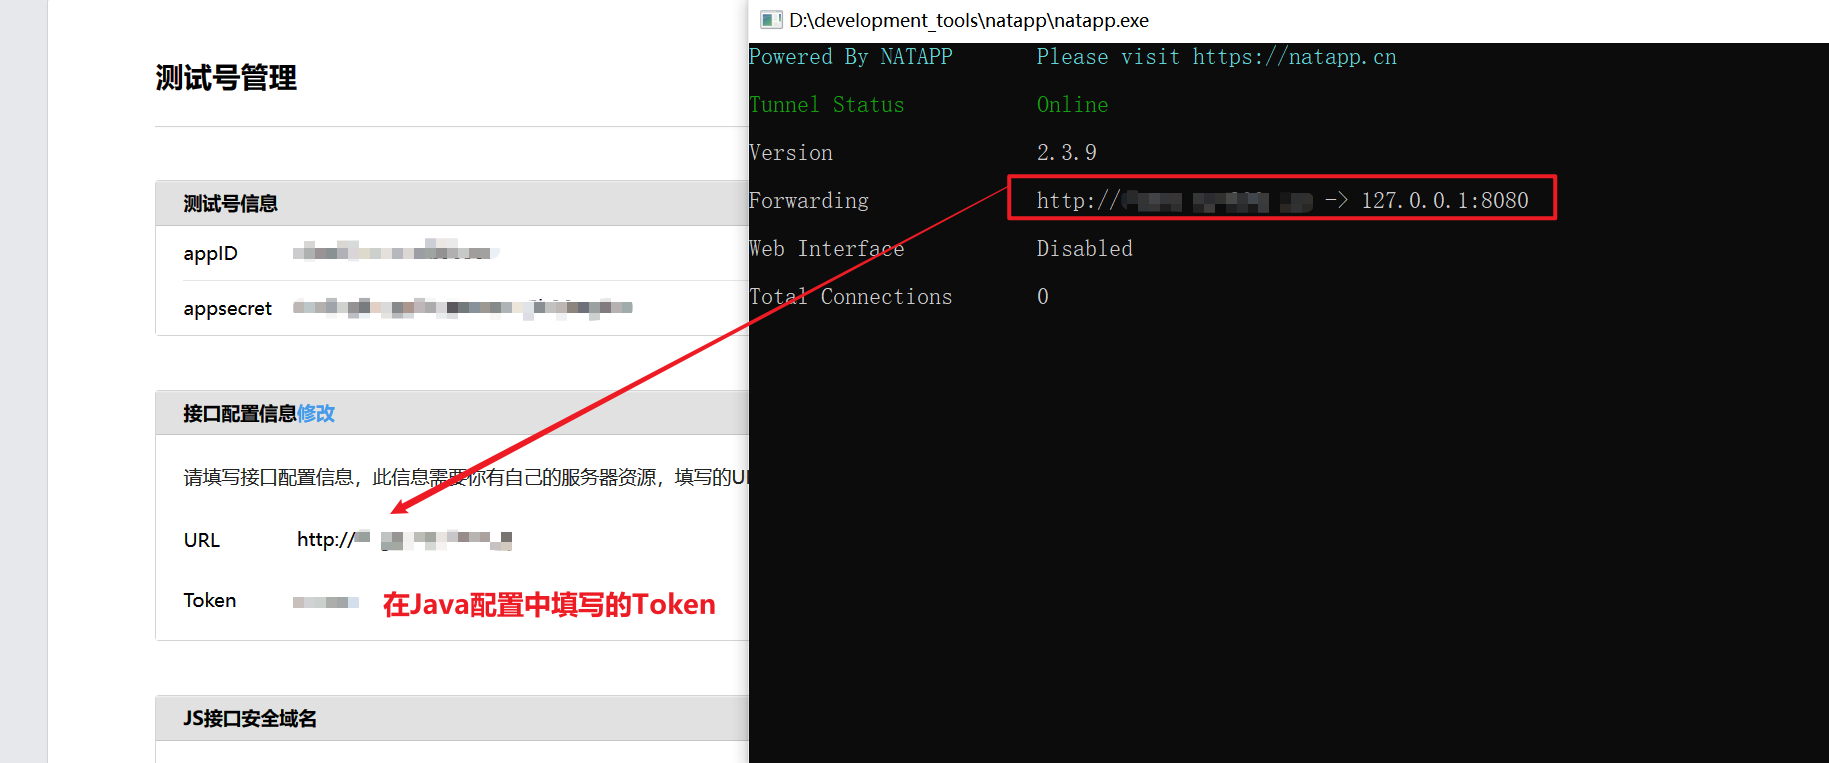
三.配置内网穿透
什么是内网穿透?说白了就是让其他人能够在网上访问到你电脑本地的接口。
我使用的是 natapp,网上有很多教程,遇到大问题可以去搜一搜。
NATAPP-内网穿透 基于 ngrok 的国内高速内网映射工具
配置完成后,可以在一些 api 工具中测试一下这个域名,看看请求能不能成功发送到本地
- 在微信开发者平台填入相关信息
- 能够成功配置,即表示接入成功!就可以开发后续功能了
踩坑
如果这里内网穿透你使用的是自定义域名,并且域名在除了阿里云的其他厂商备案,那么你在发请求到该域名时,会被阿里云安全拦截!导致配置失败!
- 要么在阿里云再备案一次,较麻烦
- 花点小钱在 natapp 买一个二级域名就可以了,推荐

四.设置公众号菜单
在公众号中我们常常能看到一些按钮,通过点击按钮能够满足不同的需求

我们也能通过代码来更加个性化的定制我们的菜单(只有认证用户可使用接口定制菜单)
编写 controller
- 可以通过 wxMenuButton.setSubButtons(List<WxMenuButton> subButtons);方法来设置某个菜单的子菜单
- 可以通过 wxMenuButton.setUrl(String url)方法来设置点击菜单跳转的 url
1
2
3
4
5
6
7
8
9
10
11
12
13
14
15
16
17
18
19
20
21
22
23
24
25
26
27
|
@GetMapping("/setMenu")
public String setMenu() throws WxErrorException {
log.info("setMenu");
WxMenu wxMenu = new WxMenu();
WxMenuButton wxMenuButton1 = new WxMenuButton();
wxMenuButton1.setType(MenuButtonType.CLICK);
wxMenuButton1.setName("今日课程");
wxMenuButton1.setKey(WxMpConstant.CLICK_COURSE_KEY);
WxMenuButton wxMenuButton2 = new WxMenuButton();
wxMenuButton2.setType(MenuButtonType.CLICK);
wxMenuButton2.setName("作业");
wxMenuButton2.setKey(WxMpConstant.CLICK_HOMEWORK_KEY);
wxMenu.setButtons(Arrays.asList(wxMenuButton1, wxMenuButton2));
wxMpService.getMenuService().menuCreate(wxMenu);
return "ok";
}
|
五.消息的接收与处理
流程图
- 可以看出我们 Java 后端需要编写
- 一个接口用来接收微信发给我们的消息,校验签名
- 配置路由来路由不同类型的消息
- 对于每种消息的处理器
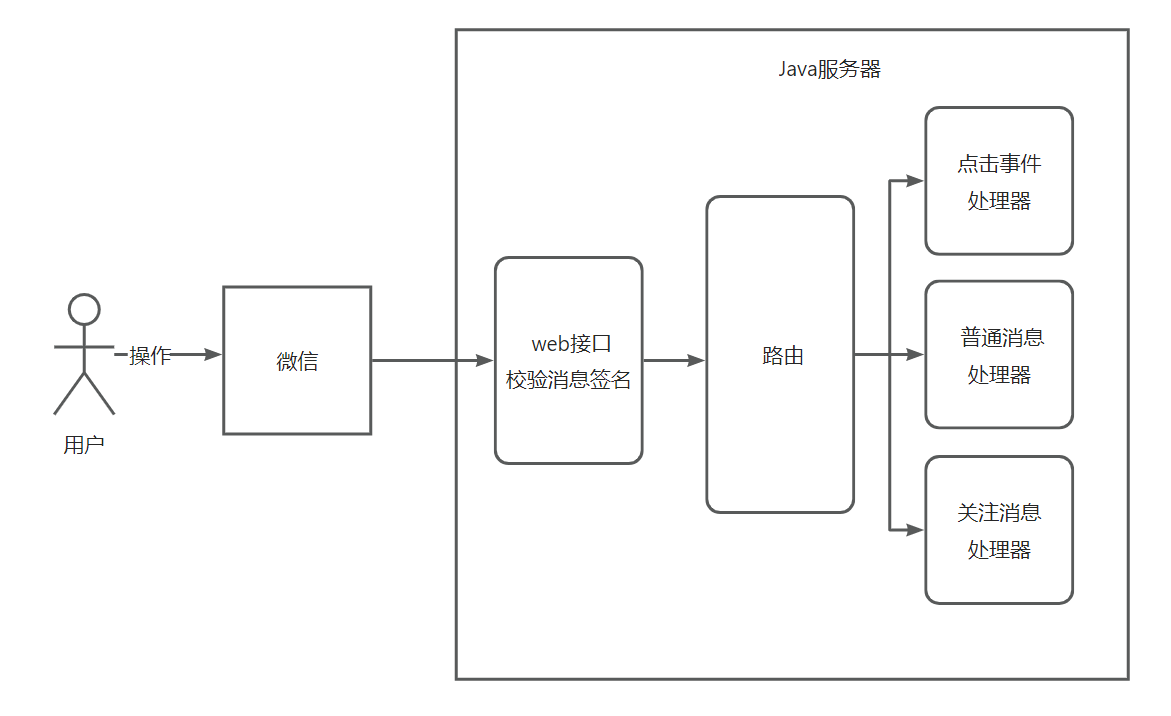
消息处理器编写接口
我们只需要实现 WxMpMessageHandler 就可以编写一个微信消息的处理器,下面给出几个示例:
1
2
3
4
5
6
7
8
9
10
11
12
13
14
15
16
17
18
19
20
21
22
23
24
|
@Component
public class EventHandler implements WxMpMessageHandler {
@Override
public WxMpXmlOutMessage handle(WxMpXmlMessage wxMpXmlMessage, Map<String, Object> map, WxMpService wxMpService,WxSessionManager wxSessionManager) throws WxErrorException {
String eventKey = wxMpXmlMessage.getEventKey();
String content = "";
switch (eventKey) {
case 某个key:
break;
}
return WxMpXmlOutMessage.TEXT().content(content)
.fromUser(wxMpXmlMessage.getToUser())
.toUser(wxMpXmlMessage.getFromUser())
.build();
}
}
|
1
2
3
4
5
6
7
8
9
10
11
12
13
14
15
16
17
18
19
20
21
22
|
@Component
@Slf4j
public class MessageHandler implements WxMpMessageHandler {
@Override
public WxMpXmlOutMessage handle(WxMpXmlMessage wxMpXmlMessage, Map<String, Object> map,WxMpService wxMpService, WxSessionManager wxSessionManager) throws WxErrorException {
String content = wxMpXmlMessage.getContent();
String res = "我是复读机哇:"+content;
return WxMpXmlOutMessage.TEXT().content(res)
.fromUser(wxMpXmlMessage.getToUser())
.toUser(wxMpXmlMessage.getFromUser())
.build();
}
}
|
1
2
3
4
5
6
7
8
9
10
11
12
13
14
15
16
17
18
19
|
@Component
public class SubscribeHandler implements WxMpMessageHandler {
@Override
public WxMpXmlOutMessage handle(WxMpXmlMessage wxMpXmlMessage, Map<String, Object> map, WxMpService wxMpService, WxSessionManager wxSessionManager) throws WxErrorException {
final String content = "感谢关注";
return WxMpXmlOutMessage.TEXT().content(content)
.fromUser(wxMpXmlMessage.getToUser())
.toUser(wxMpXmlMessage.getFromUser())
.build();
}
}
|
注册路由
将刚刚写的处理器注册到路由中
1
2
3
4
5
6
7
8
9
10
11
12
13
14
15
16
17
18
19
20
21
22
23
24
25
26
27
28
29
30
31
32
33
34
35
36
37
38
39
40
41
42
43
44
45
46
47
48
49
50
51
52
53
54
|
@Configuration
public class WxMpMsgRouter {
@Resource
private WxMpService wxMpService;
@Resource
private EventHandler eventHandler;
@Resource
private MessageHandler messageHandler;
@Resource
private SubscribeHandler subscribeHandler;
@Bean
public WxMpMessageRouter getWxMsgRouter() {
WxMpMessageRouter router = new WxMpMessageRouter(wxMpService);
router.rule()
.async(false)
.msgType(XmlMsgType.TEXT)
.handler(messageHandler)
.end();
router.rule()
.async(false)
.msgType(XmlMsgType.EVENT)
.event(EventType.SUBSCRIBE)
.handler(subscribeHandler)
.end();
router.rule()
.async(false)
.msgType(XmlMsgType.EVENT)
.event(EventType.CLICK)
.eventKey(WxMpConstant.CLICK_COURSE_KEY)
.handler(eventHandler)
.end();
router.rule()
.async(false)
.msgType(XmlMsgType.EVENT)
.event(EventType.CLICK)
.eventKey(WxMpConstant.CLICK_HOMEWORK_KEY)
.handler(eventHandler)
.end();
return router;
}
}
|
编写接口
- 先校验参数的正确性
- 判断加密类型
- 路由消息
- 返回信息
1
2
3
4
5
6
7
8
9
10
11
12
13
14
15
16
17
18
19
20
21
22
23
24
25
26
27
28
29
30
31
32
33
34
35
36
37
38
39
40
41
42
43
44
45
46
47
48
49
50
51
52
53
54
55
56
| @Resource
private WxMpMessageRouter router;
@PostMapping("/")
public String receiveMessage(HttpServletRequest request, HttpServletResponse response, @RequestBody String requestBody) {
response.setContentType("text/html;charset=utf-8");
response.setStatus(HttpServletResponse.SC_OK);
String signature = request.getParameter("signature");
String nonce = request.getParameter("nonce");
String timestamp = request.getParameter("timestamp");
if (!wxMpService.checkSignature(timestamp, nonce, signature)) {
throw new BusinessException(ErrorCode.FORBIDDEN_ERROR, "非法的请求!");
}
String encryptType = StringUtils.isBlank(request.getParameter("encrypt_type")) ? "raw" : request.getParameter("encrypt_type");
String out = null;
if ("raw".equals(encryptType)) {
WxMpXmlMessage inMessage = WxMpXmlMessage.fromXml(requestBody);
log.info("message content = {}", inMessage.getContent());
WxMpXmlOutMessage outMessage = router.route(inMessage);
if (outMessage == null) {
return "";
} else {
out = outMessage.toXml();
}
}
if ("aes".equals(encryptType)) {
String msgSignature = request.getParameter("msg_signature");
WxMpXmlMessage inMessage = WxMpXmlMessage
.fromEncryptedXml(requestBody, wxMpService.getWxMpConfigStorage(), timestamp,
nonce,
msgSignature);
log.info("message content = {}", inMessage.getContent());
WxMpXmlOutMessage outMessage = router.route(inMessage);
if (outMessage == null) {
return "";
} else {
out = outMessage.toXml();
}
}
log.info("\n组装回复信息:{}", out);
return out;
}
|
测试
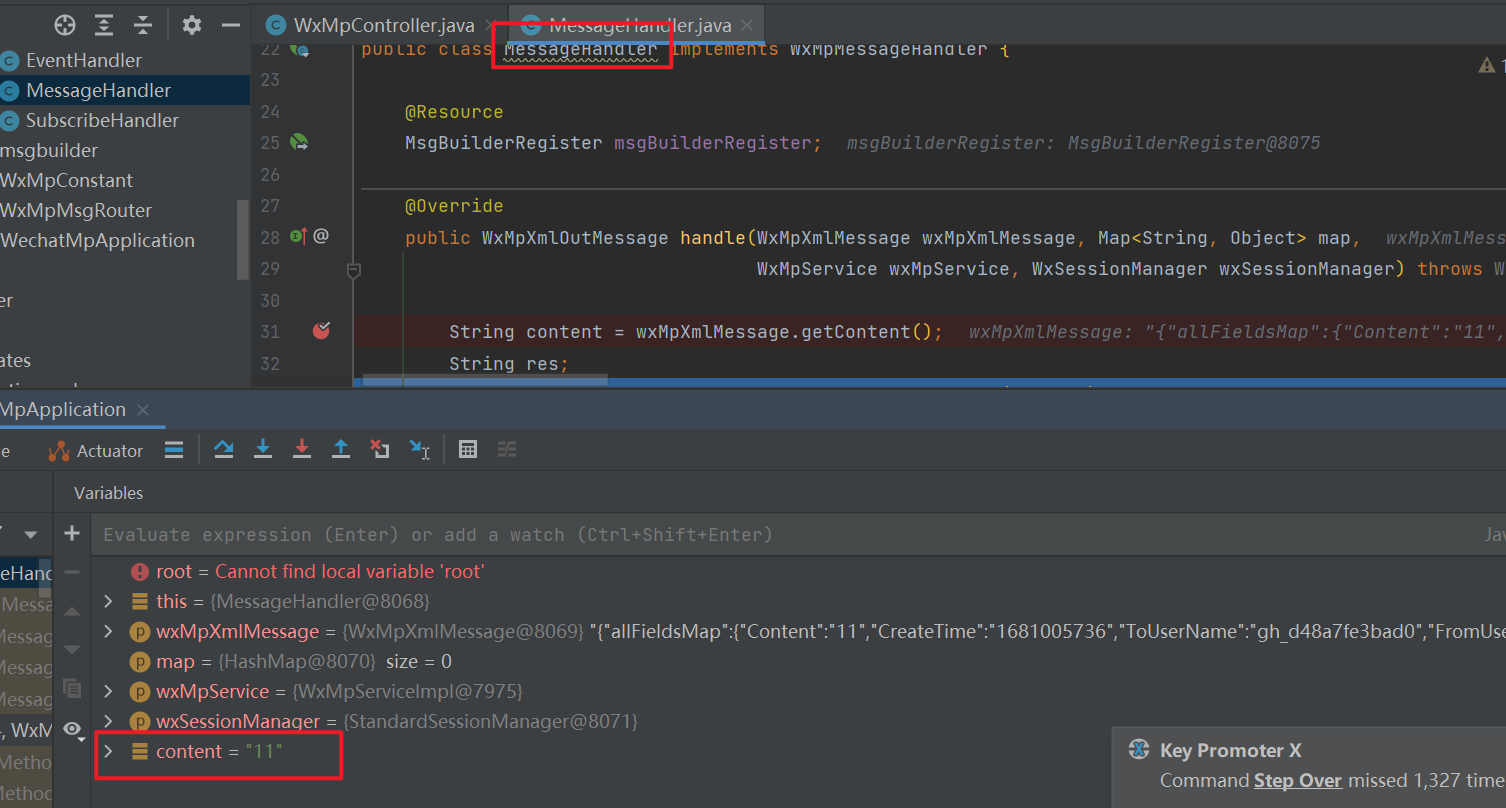
在测试号中发送消息,后端打好断点,可以看到发过来的消息
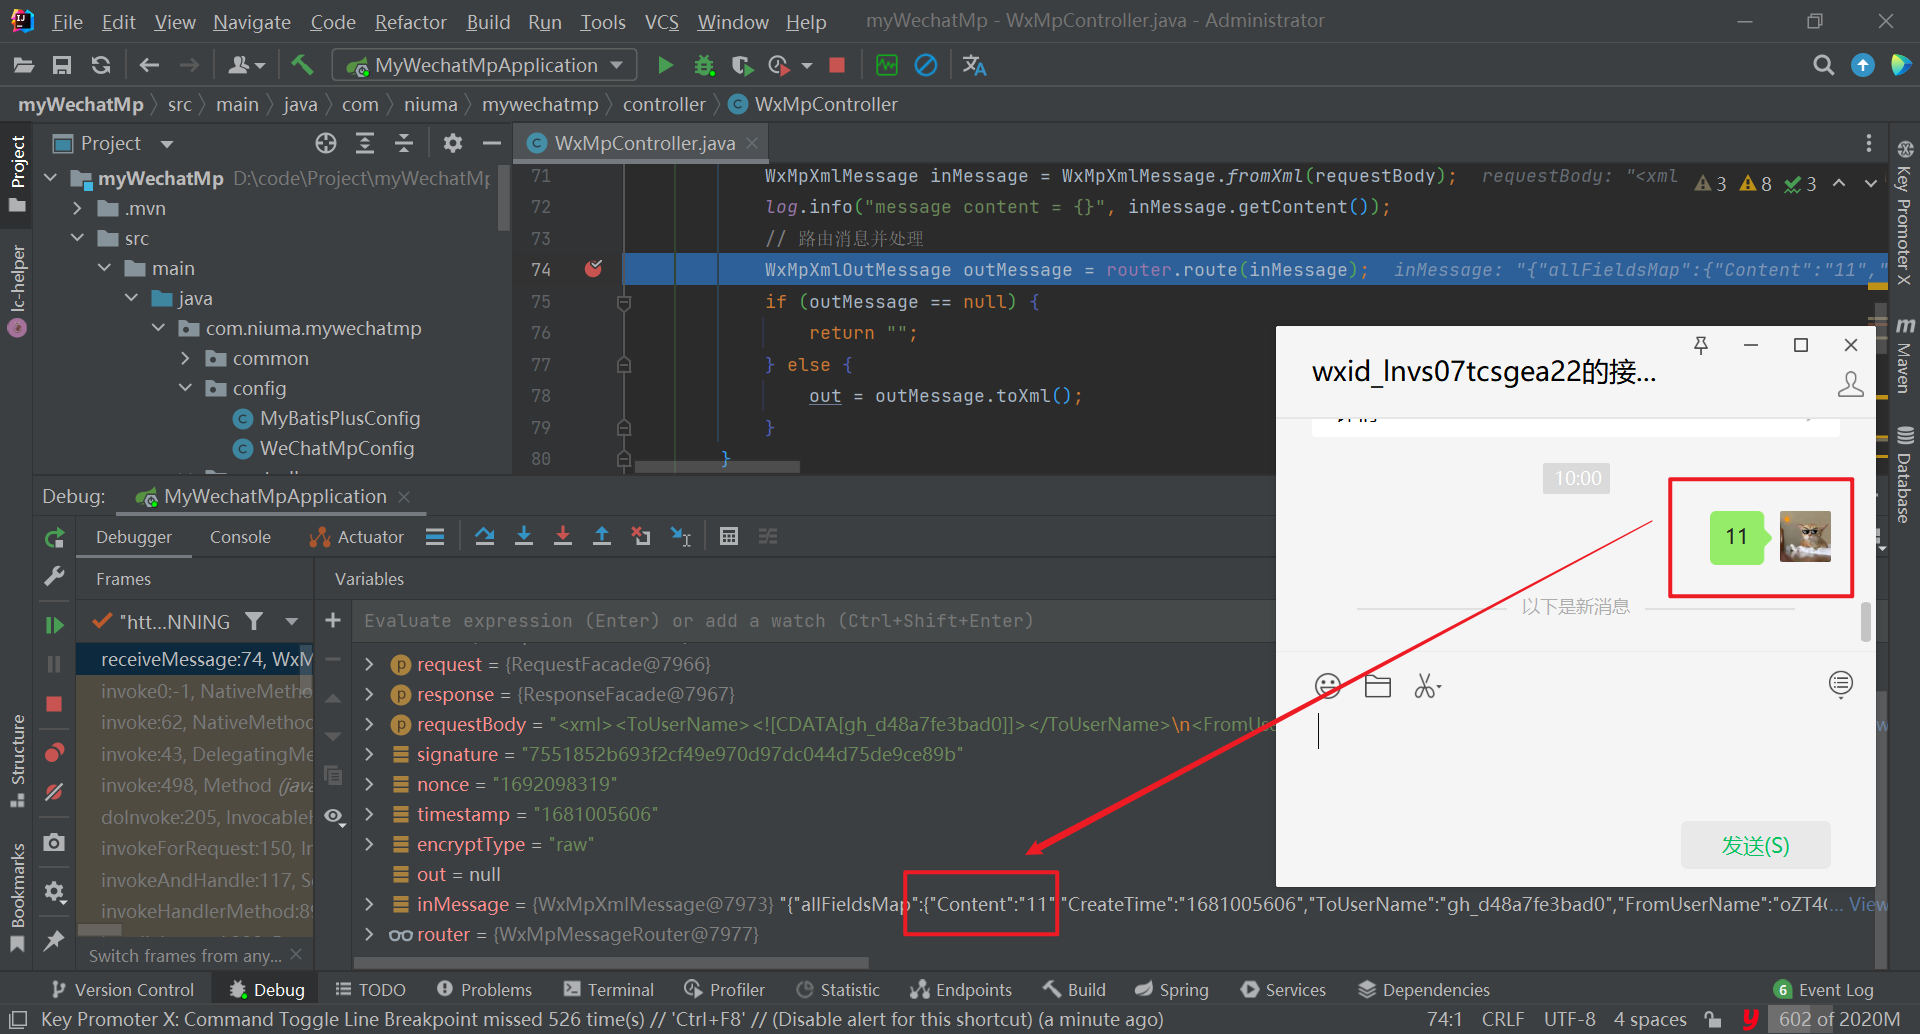
消息也成功的路由到处理器中
同样的,点击按钮也可以触发响应的处理器。
六.群发消息
一、前言 | 微信开放文档 (qq.com)
这里提供一个群发消息的方法,群发消息也需要微信认证才行
1
2
3
4
5
6
7
8
9
10
11
12
13
14
15
16
17
18
19
20
21
22
23
24
| public void sendAllMsg(String text) {
String accessToken = this.getAccessToken();
String reqUrl = "https://api.weixin.qq.com/cgi-bin/message/mass/sendall?access_token=" + accessToken;
Map<String, Object> param = new HashMap<>();
param.put("msgtype", "text");
Map<String, Object> content = new HashMap<>();
content.put("content", text);
param.put("text", content);
Map<String, Object> filter = new HashMap<>();
filter.put("is_to_all", true);
filter.put("tag_id", "");
param.put("filter", filter);
String json = JSONUtil.toJsonStr(param);
String body = HttpRequest.post(reqUrl)
.body(json)
.execute()
.body();
log.info("群发消息返回:{}", body);
}
|